Who Said Photography
understanding camera modes
Down Arrow

Digital Camera Modes: Understanding Shooting Modes Guide

Do you want to better understand Digital Camera Modes? If you’re an aspiring photographer looking to get the most out of your camera, you’ve come to the right place. Let’s take a deep dive into your camera setting modes, and see if we can up your photography skills. Keep your camera handy as you work through the guide.

Table of Contents

What are camera modes?

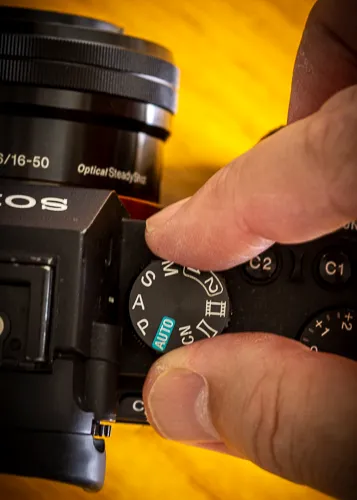
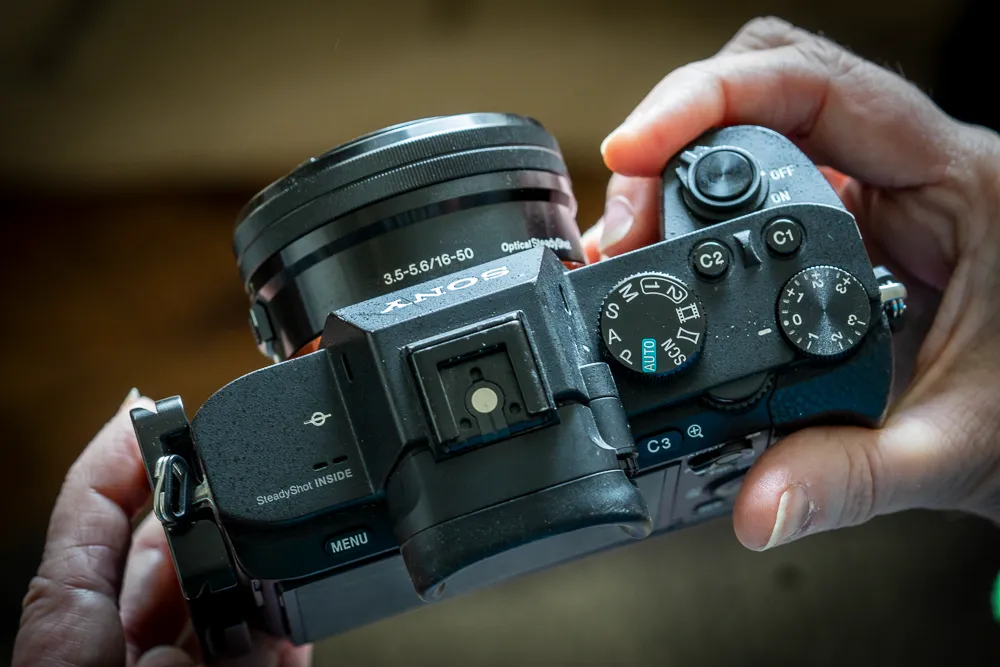
Digital cameras offer various modes that allow photographers to adjust and control the camera settings based on their shooting needs and conditions.

  1. Auto Mode: The camera makes all the decisions regarding exposure, focus, white balance, and other settings. It is suitable for beginners or when you want the camera to handle everything.
  2. Program Mode (P): Program mode is similar to Auto mode, it allows some manual adjustments. The camera selects the optimal exposure settings, while you have the flexibility to adjust settings like ISO, white balance.
  3. Aperture Priority Mode (A or Av): In this mode, you manually set the aperture (f-stop), while the camera adjusts the shutter speed to maintain proper exposure.
  4. Shutter Priority Mode (S or Tv): Shutter priority mode, you set the desired shutter speed, and the camera controls the aperture.
  5. Manual Mode (M): Manual mode gives you full control over all camera settings, including aperture, shutter speed, ISO, white balance, and more. It provides maximum creative freedom but requires an understanding of exposure.
  6. Scene Modes: Many cameras include scene modes tailored for specific situations, such as portraits, landscapes, sports, night photography, and more. These modes optimize settings for the particular scenario, making it easier to capture suitable shots. Similar to Auto
  7. Custom Modes: Advanced cameras often have custom modes (C1, C2, etc.) where you can save your preferred settings for quick access. It allows you to personalize the camera’s behaviour and switch between setups easily.

Remember, the availability of your digital camera modes may vary depending on the brand, model, and firmware version. It’s always helpful to consult your camera’s user manual for specific information about the modes and features it offers.

What is the best mode for beginner photographers?

Digital Camera Modes

As a photograph enthusiast, I always get asked: “What’s the best mode for beginner photographers?” Well, my answer is simple – start with “P”(program mode). Trust me, it’s the best way to get shooting without getting bogged down in the technicalities of a camera. Digital cameras are essentially computers and can be daunting at first. However, using program mode is a good way to become acquainted with the camera’s features.

We don’t want to discourage you with complicated settings right from the start. So, grab your camera and give program mode a try. You’ll be capturing stunning shots in no time!

What are the different camera modes?

1. Auto Mode:

Auto mode is a great feature for beginners. With auto mode, the camera takes care of all the settings. Giving you time to focus on framing the shot and capturing the moment. Auto mode is handy when you’re in a hurry and don’t have time to make manual adjustments.

Pros:

  • Easy to use, perfect for beginners.
  • Camera takes care of all technical settings.
  • Quick and convenient when short on time.

Cons:

  • Might not be the best decisions for every situation.
  • Images might not turn out as desired.
  • Limited creative control over photos.

2. Program Mode

Program mode is a semi-automatic shooting mode, allowing you to make some adjustments. Enabling the operator to control the third parameter in the exposure triangle, the ISO.

The camera will automatically match the aperture and shutter speed to achieve optimal exposure.

This mode is great for quick shots, as it eliminates the need to fiddle with too many settings. Another easy mode that is perfect for beginners.

Pros:

  • Gives more creative control than auto mode.
  • Allows camera to handle technical settings.
  • Good balance of control and ease of use.

Cons:

  • Camera still makes some decisions about settings.
  • Not as much control as manual mode.
  • Images might not turn out as desired if not used correctly.

3. Aperture Priority Mode

Aperture priority mode is widely used. You choose the desired aperture, and the camera selects the shutter speed. Aperture affects the depth of field, allowing us to separate the background from the foreground.

Aperture priority mode is useful for many types of photography, but is beneficial for portrait, landscape, and macrophotography. Keep in mind that Aperture Priority isn’t suitable for fast-moving objects.

Pros:

  • Gives control over depth of field, allowing for more creative options.
  • Camera automatically shutter speed to maintain proper exposure.
  • Good for portraits or situations where you want a shallow depth of field.

Cons:

  • Not as much control as manual mode, limiting in some situations.
  • May require some trial and error to get the desired depth of field, which can be time-consuming.
  • Depth of field might not always be what you want.
  • Can be difficult to get sharp focus in low light situations.

Examples of when to use aperture priority mode:

  • Portraits: Use a wide aperture (low f-number) to create a shallow depth of field, which will blur the background and draw attention to the subject’s face.
  • Landscapes: Use a narrow aperture (high f-number) to create a deep depth of field, which will keep both the foreground and background in focus.
  • Macro photography: Use a wide aperture to create a shallow depth of field, which will make the subject stand out and blur the background.

4. Shutter Priority Mode

Shutter Speed priority mode is also widely used. With shutter speed, you select the speed, and the camera automatically adjusts the aperture.

Useful for when movement or a particular shutter speed is needed to capture the essence of the shot.

If you want to freeze action, for example, a bird in flight, or a lion running. A fast shutter speed, along with a higher aperture, will prevent motion blur.

Or at the other end, a slower shutter speed will blur movement and give a feeling of motion.

Pros:

  • Allows for creative control over motion blur, whether you want to freeze action or create intentional blur.
  • Camera automatically adjusts other settings to maintain proper exposure.
  • Good for action photography or situations where you want to capture movement

Cons:

  • Camera may not always choose the best settings for the situation.
  • Can be difficult to achieve proper exposure in low-light situations.
  • Limitations in creative control compared to manual mode

Examples of when to use shutter speed priority mode:

  • Sports: Use a fast shutter speed (1/500th of a second or faster) to freeze action and capture athletes in motion.
  • Waterfalls: Use a slow shutter speed (1/4th of a second or slower) to create a silky effect on water.
  • Nighttime cityscapes: Use a slow shutter speed (several seconds or more) to capture light trails from cars or create a dreamy effect on city lights.


5. Manual Mode

Manual mode is when you have complete control over all the setting of the camera. You control the aperture, shutter speed, and ISO, plus white balance and focus area.

Can be used for any genre of photography, landscape, food, and product photography, or any situation where a static subject is being photographed.

Manual mode is beneficial in extreme light conditions, photographing the milky-way or steel wool. It allows us to experiment with different settings in order to get the desired level of exposure.

Pros:

  • Complete creative control over all camera settings.
  • Ability to achieve desired exposure and effects in any situation.
  • Good for situations with consistent lighting, such as studio photography.

Cons:

  • Steep learning curve, takes time and practice to master.
  • Requires knowledge of technical settings and how they affect the image.
  • Time-consuming to adjust settings for each shot.

Examples of when to use manual mode:

  • Studio photography: Use manual mode to ensure consistent lighting and achieve the desired exposure for each shot.
  • Night sky photography: Use manual mode to set a long exposure time and capture stars or the Milky Way.
  • High-contrast scenes: Use manual mode to balance the exposure between bright and dark areas, such as a backlit subject or a scene with strong shadows.

How to use the different camera modes?

How to use the best digital camera modes

Step 1: Get familiar with the mode’s functions

It is important for a beginner photographer to be familiar with digital camera modes. Once you understand what each mode does, and where and when to use each of these modes. You will enjoy photography more and have a better chance of capturing the photos you want. Understanding different camera modes can help you choose the best mode for each situation, resulting in better photos.

By familiarizing themselves with different camera modes, beginner photographers can take their photography skills to the next level and capture stunning images.

Step 2: Experiment with different digital camera modes

  • Start by choosing the mode you want to use, Program (P), Aperture (A), Shutter Speed (S), and Manual (M).
  • Depending on what mode you have selected, set the aperture, shutter speed, and ISO settings you want to use. This will depend on lighting conditions.
  • Adjust the camera to the correct exposure setting.
  • Take a few test shots to check the exposure. You can use the histogram and LCD screen to preview the image and make adjustments if needed.
  • Experiment with different settings to see how they affect the image. Change the aperture, shutter speed, or ISO to see what effect it has on the image.
  • Review your photo. This will help you learn what settings work best in what situations.
  • Finally, try the other modes. These include the specific modes for different subjects and settings and are great for practicing and understanding how each mode works.

Step 3: Get used to using different modes

  • Familiarize yourself with the different camera modes. Remember, this acronym PASM (Program, Aperture Priority, Shutter Priority, Manual)
  • Learn how each mode works for a particular subject. Pay special attention to how the three parameters of the exposure triangle change. Start by experimenting with the different knobs and buttons on your camera in the program mode.
  • Playing with the different settings available in each mode. For example, in aperture mode, set different apertures, what happens to the shutter speed?
  • Explore the additional modes and experiment with them. By experimenting with different settings and modes, you’ll gain a better understanding of how to use each for different scenarios.
  • Once you get a better grasp of the different camera modes, use them to your advantage. With practice, you will soon be able to create the photo you have in mind quickly and easily.

Step 5: Understand the exposure triangle in camera modes

Understanding the exposure triangle is essential when learning about how to use the different digital camera modes.

The exposure triangle has three elements: aperture, shutter speed, and ISO. Each of these elements affects the photo differently. Mastering the exposure triangle will enable you to get the perfect photo in any lighting situation.

Step 6: Choose your preferred mode for 95% of scenarios

Once you have familiarized yourself with all the digital camera modes, you’ll use them for 95% of the time.

For me, aperture priority is my go-to mode. It offers me the most control for what I like to shoot. However, in tricky lighting conditions or fleeting moment, I’ll switch to shutter or manual mode.

Conclusion on Digital Camera Modes

To wrap things up, I hope this post on digital camera modes has helped you understand their importance. By using different modes, you can achieve creative and professional-looking shots in various situations. While Auto mode can be great for quick snapshots, understanding the pros and cons of other modes like Aperture Priority, Shutter Speed Priority, and Manual, can take your photography skills to the next level.

Remember, mastering the exposure triangle and experimenting with different modes can help you capture your vision and style. So, keep learning and exploring the exciting world of digital camera modes!

Frequently Asked Questions

Digital camera modes offer different ways to control settings like aperture and shutter speed. Understanding these modes helps to achieve desired shots.

The four main types of digital camera modes are Auto, Program, Aperture Priority, and Shutter Speed Priority. Each mode offers unique control over camera settings.

The symbols on a camera mode dial represent different shooting modes. The most common symbols include Auto, P (Program), A/Av (Aperture Priority), S/Tv (Shutter Speed Priority), and M (Manual).

The camera mode can typically be set on the mode dial located on the top of the camera body. Some cameras also allow mode selection through the camera menu.

Manual Mode gives full control over all camera settings, while Aperture Priority Mode lets you set aperture and the camera adjusts other settings accordingly.

Our Latest Blogs