Who Said Photography
Have you ever wonder what you need for Night Sky photography Equipment
Down Arrow

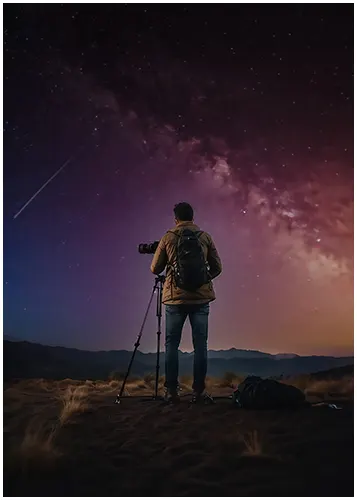
Night Sky Photography Equipment: Gear up for the stars

So, you’re intrigued by the beauty of the stars and want to capture stunning images with your camera and lens? Welcome to the fascinating realm of Night Sky Photography!

Night Sky Photography involves pointing your camera to the sky to capture amazing images of celestial bodies. For example, snapping vibrant shots of the Milky Way on a clear night. You don’t need a spaceship to start, guess what? Just your camera, modifying a few settings, and some helpful accessories.

The sky is indeed the limit, let’s explore!

Table of Contents

 My List For Night Sky Photography Equipment 

1. Camera or Cameras and Lens

Camera gear is crucial for night sky photography as it determines the image quality and your flexibility in capturing celestial bodies. Here are some essential features:

  • Ability to take long exposures
  • Full-frame camera body
  • Compatibility with various lenses

Pros:

  • Digital cameras offer instant feedback, providing flexibility in adjusting settings.
  • Mirrorless camera bodies are lighter and smaller for frequent travelers.
  • Ability to use older lenses with Nikon bodies
  • Wide angle lenses allow capturing a large portion of the night sky.
  • Fast lenses absorb more light, benefiting in low light conditions.

Cons:

  • They can be expensive, especially full-frame cameras.
  • DSLR lenses won’t work on these bodies without an adapter.
  • Canon has different mounting formats, which limits lens compatibility.
  • A fish-eye lens can cause distortion at the edges.
  • Lower “aperture” lenses, which are faster, are generally expensive.

Note: Prices vary across different features and brands. Choose what suits your needs and budget.

1a. Mirror-less vs Digital Camera 

Gone are the days when one could claim outright superiority for either mirrorless or DSLR cameras. The latest advancements have blurred the lines, making the choice more about personal preferences and specific shooting styles. Picture yourself under a canopy of stars, pondering which camera is your guiding star in the realm of night sky photography. Not going to happen!

Both mirrorless and DSLR cameras have their unique strengths and quirks, much like the stars in our night sky. It’s your skill, your dedication, and your eye for detail that will ultimately determine your success in capturing the ethereal beauty of the cosmos. The best advice I can give you is to get out there and shoot.

2. Best Lenses Wide-Angle Lens

With a fast wide angle lens, capturing the majesty of the night sky becomes a thrilling reality. It’s your ticket to detail-rich night landscapes, capable of gathering enough light for vibrant, sharp shots.

  • The key benefit lies in the lens’s large aperture (around f/2.8 or lower), allowing it to snag as much light in a short span.
  • This type of lens offers a vast field of view, perfect for star clusters, nebulae, and planets.
  • Their capacity for fitting a lot of scenery in one shot, as seen in lenses such as the Nikkor 14-24mm f/2.8, lets you compose awe-inspiring compositions.
  • Even on a budget, you’ve got options like a 24mm prime lens, ensuring you never miss a stellar shot.

Remember, in night sky photography, your lens is the wide-open eye to the cosmos.

3. Sturdy Tripod

In night sky photography, the importance of a sturdy tripod cannot be overstated. It’s not just an accessory, but an essential piece of gear. Here’s why:

  • Remains steady during long exposures, ensuring sharp images.
  • Complements your camera for those perfect upward shots in dim lights.
  • Reduces vibrations, even in windy conditions.
  • The better the build, the less likely it is to shake or move; aluminum and carbon fibre are top picks.
  • Ideally, opt for designs offering adjustable ball heads with a rotation of 360 degrees and quick-release plates.

Remember, quality is key – a good tripod can make the difference between a blurred mess and a breathtaking representation of the night sky.

4. Remote Shutter Release

A Remote Shutter Release is a handy gadget that significantly elevates your night sky photography skills. It lets you snap photos without touching your camera, thereby offering crisp, blur-free shots. Here’s why it’s a game-changer:

  • It eradicates camera shake, ensuring tack-sharp shots time and again.
  • With certain advanced options, you can display and control the exposure time, crucial for long exposures or dramatic star trails.
  • It offers improved functionality over most built-in intervalometers.
  • Paired with a steady tripod, it’s an astounding solution to shutter-induced instabilities.
  • Some models support smartphone app controls for added convenience.
  • It’s indispensable when capturing sequential images, like in time-lapse or star trail photography.

5. Plenty of Batteries

Nighttime photography, especially of the breathtaking sky, is an exhilarating experience. But, without keeping track of your batteries, you could end up with disappointing results. Remember, batteries are as crucial as your camera. Let’s look at why:

  • Continuous shooting, particularly for capturing star trails or time lapses, can drain your camera’s batteries more than usual. Always check your equipment before the shoot.
  • Cold nights zap away battery life faster than expected. Hence, in cooler temperatures, carry a few more than usual.
  • If your camera has the option to draw power from a USB connection continuously, using a power bank to keep it charged overnight can make a huge difference.
  • Alternatively, keep swapping out batteries when their charge level hits one bar. This approach works smoothly if you’re not shooting time lapses.

Bear in mind, any interruption during the shoot could ruin your entire effort, so always be over-prepared in terms of power sourcing.

Example of night sky photography equipment.

6. Light Pollution Filter

A night filter is a game-changer for night sky photography. It helps filter out wavelengths of light pollution, thus improving the clarity and balance of your shots.

  • It’s easy to fit on your lens.
  • Reduces the effect of light pollution
  • Enhances the contrast of your shots.
  • Offered by reputable brands like NiSi and LEE
  • Clears away urban sky glow
  • Boosts image contrast
  • Fits various sizes
  • Can be used in the day as well
  • Suitable for wide and super wide-angle lenses
  • Large sizes are pricey.
  • Requires investment

Although not exactly budget-friendly, it’s worth every penny for the level of precision it allows.

8. Focus Aid Filter

A Focus Aid Filter, also known as a Bahtinov mask, helps with precise focus in night sky photography and astrophotography.It consists of a mask with a specific pattern of slits or lines arranged in a specific way.

Here’s how it works:

  • Attach to lens: You attach the Focus Aid Filter over the front of your camera lens or telescope objective.
  • Aim at a Star: Point your camera or telescope at a bright star or celestial object.
  • Ensure the Perfect Focus: meticulously adjust the focus until the diffraction spikes, generated by the filter pattern, harmoniously intersect at the very heart of the star.
  • Precise Focus: When the diffraction spikes align, it indicates that your focus is set. Ensuring that stars appear as sharp points of light in your night sky photos.

This tool is particularly useful for astro-photographers because achieving accurate focus in the dark night sky can be challenging. The Focus Aid Filter simplifies the process and helps produce sharper and more detailed images of celestial objects.

8a. Focusing in the dark – My Pro Tips

Mastering the art of focusing your camera in the dark is an absolute game-changer. Picture yourself in the pitch-black wilderness, with the Milky Way sprawled across the heavens – that’s your canvas. Here are some pro-tips to ensure your focus is as sharp as the stars themselves:

Pros:

  • Manual Focus Control: With manual focus, you have full control over your shot. You can precisely adjust your lens to achieve tack-sharp focus on your desired subject, be it a distant constellation or a celestial event.
  • Use Live View Mode: Engage your camera’s Live View mode to magnify a bright star or planet. This allows you to fine-tune your focus while seeing a highly magnified view on your screen.
  • Focus Peaking: Some cameras offer a focus peaking feature that highlights in-focus areas with a coloured overlay. It’s a fantastic tool for nailing focus in low-light conditions.
  • Infinity Focus Mark: Learn to identify the infinity focus mark on your lens. For wide-angle astrophotography, setting your lens to this mark often yields sharp results without the need for complex adjustments.
  • Flashlight Assistance: In case you need a little extra light to assist your focus, use a red LED flashlight. Red light won’t disrupt your night vision or disturb others in your group.

Cons:

  • Time-Consuming: Achieving perfect focus in the dark can be time-consuming, especially when you’re working with manual focus. Patience is key.
  • Lens Specific: Each lens may have a slightly different focusing method. You’ll need to get acquainted with your gear to consistently achieve great results.
  • Vulnerable to Mistakes: It’s easy to misjudge focus in the dark, and a small mistake can lead to blurry images, which can be frustrating.
  • Weather Challenges: Harsh weather conditions like wind or cold can make focusing even more challenging, as you’re exposed to the elements.
  • Limited Autofocus: While some modern cameras offer decent low-light autofocus capabilities, many struggle to focus in extreme dark environments, making manual focus a necessity.

With a bit of practice, you’ll sharpen your focusing skills and elevate your night sky photography to new heights. Happy stargazing!

9. Headlamp

A headlamp will be your trusty sidekick. Why? It ensures you can set up, focus, and adjust your camera with both hands free in the dark, making it a vital piece of kit. Just remember to flick it off before hitting the shutter. Also, look out for these top-notch features:

  • Red light mode: Perfect for preserving your night vision.
  • Long runtime: A single charge should last you the whole night.
  • IXP4 waterproof rating: No rain, no problems.
  • Light weight: At 2.75oz, it shouldn’t weigh down your night of stargazing.
  • USB-C rechargeable: Easy to top up the battery for the next shoot.

10. Tracking App

A tracking app for night sky photography can be a game-changer. Why? It’s like having an astronomical guide right in your pocket. Top features include:

  • Precise meteor activity forecasts
  • Detailed information on moon phases
  • Alerts about celestial events
  • Exact positioning of celestial bodies
  • Maps of light pollution

As for pros and cons:

  1. It aids navigation, ensuring you’re capturing the right object.
  2. It gives hour-by-hour forecasts for meteor showers, enhancing your chances of capturing the right moment.
  3. Some even provide light pollution maps, aiding in selecting the perfect location.
  4. However, proper calibration is necessary for accurate positioning.
  5. Some advanced features might require payment.

With this tool, you’re not just shooting in the dark!

Example of night sky photography equipment.

11. Smartphone App

Your smartphone isn’t just a communication tool, it’s a critical companion for your night sky photography ventures. It helps you navigate to remote locations, serves as a lifeline in emergencies, and, with the right apps, acts as an all-in-one photography assistant. Here are its notable features:

  • Guides you to the perfect shooting location.
  • Provides emergency help in signal range
  • Offers photography-enhancing apps like Photopills and Astrospheric
  • Helps plan the shoot based on moon phases.
  • Predicts meteor activity and solar weather.

Conclusion: Gearing up for the Stars.

In closing, remember your star photography journey relies heavily on the right gear. Equip yourself with a large aperture lens for shooting vibrantly detailed starry skies. Incorporate a star tracker to enhance the clarity and impact of your Milky Way snaps. Always count on long exposure to capture stunning astrophotography images. Then, remember to ‘stack’ images for a mesmerizing night sky view. Don’t forget to meticulously plan each shot—and hey, feel free to experiment along the way. Embarking on this captivating night sky photography journey, we wish you clear skies and memorable captures!

Frequently Asked Questions

For night photography, essential equipment includes a full-frame camera, wide angle lens, tripod, a quality headlamp, and light pollution filter. Remember to pack spare batteries.

The distance you need to wander out of town to find acceptably dark skies for star photography varies. You can use resources like light pollution map info to find places with less light pollution and ideal for capturing clear star images.

To capture clear photos of the night sky, you’ll need a stable tripod and a wide-angle lens with a large aperture. Keep the ISO setting low to minimize noise. Additionally, capturing in a dark, remote location away from light pollution and using manual focus for precision are key techniques.

Our Latest Blogs