S Curve Photography: A Composition Technique for Photos
S curve photography is easy to practise here on Vancouver Island because the roads rarely stay straight for long.
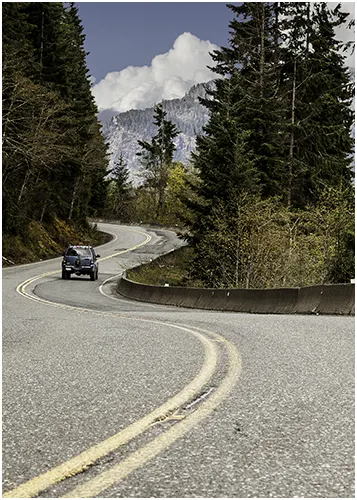
The best example I can think of is Westmin Mine Road, around Buttle Lake, toward Myra Falls. I can’t tell you how many times I’ve pulled over because the road bent around the mountain in a way that led my eye right through the photo. I wasn’t thinking about composition rules at the time. I just saw how that curve pulled the scene together.
In this guide, we’ll look at how to spot S-curves, use them with purpose, and avoid the mistakes that weaken an otherwise strong composition.
The curve can be obvious, subtle, complete, or partial.
A strong S-curve needs a clear visual purpose.
Clean framing makes curved compositions easier to read.
S-curves can work in landscapes, portraits, street scenes, and architecture.
Table of Contents
What Is an S Curve in Photography?
An S-curve is a curved line that looks like an S or part of one. It can run through the whole frame or appear as a smaller shape inside the composition.
The curve gives the eye a path to follow. Instead of feeling flat or random, the photo feels more layered. The viewer may start in the foreground, move through the curve, and land on the main subject.
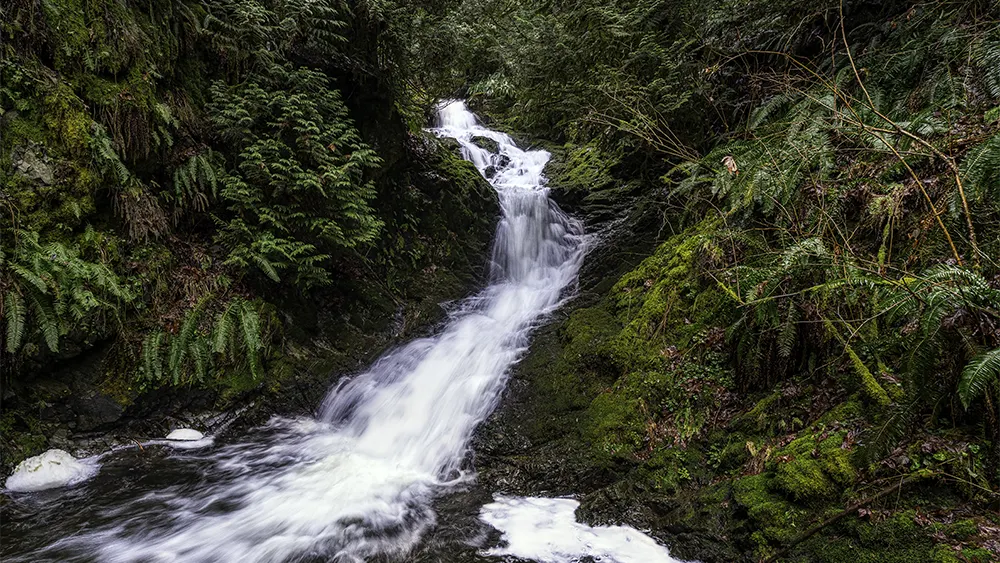
The line doesn’t need to form a perfect letter S. A winding road, bent stream, curved railing, shoreline, relaxed body pose, staircase, or light trail can all work.
In S-curve photography, the curve can be the main subject. It can also lead toward something else, like a person, tree, building, mountain, or patch of light.
Think of it as a useful compositional technique, not a strict rule. The curve should support the photograph, not take over every detail.
Why Do Curves Work So Well?
S-curves work because they create movement without making the photo feel rushed. The eye follows the bend, slows down, and spends more time moving through the frame.
A curve can add:
Depth
Rhythm
Direction
Balance
A stronger sense of flow
Curved lines also feel less stiff than straight lines. A straight road can feel bold and direct. A winding road feels slower and more inviting. Neither is better in every case, but the effect is different.
Use that effect to match the mood of the scene:
A gentle beach curve can feel calm.
A mountain road can feel like a journey.
A spiral staircase can feel elegant or dramatic.
A stream in the foreground can pull the viewer into the distance.
A natural curve can also affect balance. If the curve moves upwards, it may pull the viewer toward the distance. If it moves downwards, it may feel quieter or more grounded.
Looking to stretch your budget? We’ve got good news! Save an additional 10% use code bwild10
Where Can You Locate S-Curves?
You can find S-curves where lines naturally bend through a scene. Start with:
Roads
Rivers and streams
Paths and trails
Coastlines
Rail tracks
Stairways
Bridges
Sand dunes
Before you take the photo, scan the scene for lines. Look at the ground, edges, shadows, water, and man-made shapes.
In landscape photography, curves often appear in trails, streams, shorelines, and ridgelines. A landscape photographer might use a stream to lead the viewer toward a mountain, cloud, or patch of sky in the distance.
In cities, look for roads, sidewalks, railings, overpasses, and building details. In portraits, look at the curve of the body, arms, hands, clothing, or pose.
Colour and contrast can help too. A red coat on a path, green grass beside a road, blue water under a winter sky, or black shadow along a wall can make the curve easier to see.
How to Compose a Strong Curve Photo
Start by deciding what the curve is doing.
Ask yourself:
Is it leading toward the subject?
Is it creating depth?
Is it dividing the frame?
Is it the main subject?
Is it helping the photo feel balanced?
Once you know its job, frame around that purpose. If the curve leads to a person, tree, or building, make sure the viewer can clearly land there. If the curve itself is the subject, remove distractions that compete with its shape.
Try placing the start of the curve near the bottom edge or a corner. A curve that begins near the left corner can give the viewer an easy entry point into the image. From there, let the line move through the frame toward the main area of interest.
S curve photography also works well with:
Leading lines
Foreground interest
Framing
Negative space
Diagonal movement
The rule of thirds
A strong focal point is still essential. The curve can lead the eye, but the viewer needs a reason to stay in the photo. That might be a person, tree, cabin, bright cloud, open road, or the brightest part of the scene.
Simple Examples of S-Curves
Scene
How to Use the Curve
Common Mistake
Winding road
Let it lead toward a subject or bright area
Letting it exit the frame too fast
River or stream
Use it to create depth from foreground to background
Including too much clutter on the banks
Stairway
Shoot from above or below to show the shape
Cropping the curve too tightly
Portrait pose
Use arms, posture, or fabric to create flow
Making the pose feel forced
Light trail
Use a long exposure to show movement
Leaving no clear focal point
Use these examples as starting points, not rules. The same curve can feel calm, busy, dramatic, or confusing depending on your angle and framing.
Tips for Better S Composition
Walk the scene before you settle on one photo. Curves can change a lot with small shifts in position.
Try these quick checks:
Move left and right to clean up the curve.
Get lower if the foreground matters.
Find a higher viewpoint if the shape feels hidden.
Try horizontal and vertical framing.
Watch where the curve enters and exits the frame.
Light matters too:
Side light can reveal shape and texture.
Backlight can turn a curve into a strong outline.
Soft light can make the curve feel gentler.
Harsh light can create shadow and bright highlights that break the line.
If you shoot digital, you can improve the image later with a light edit. Adjust exposure, contrast, hue, or shadow detail only enough to support the curve. Don’t alter the scene so much that the path looks unnatural.
Common Mistakes to Avoid
One common mistake is finding a curve but not giving it a purpose. A curved road may look interesting, but the photo can feel weak if it leads nowhere.
Be careful with awkward balance. If the curve pulls all the attention to one side, the photo may feel heavy. Balance it with a subject, light, colour, or open space.
Also watch the brightest part of the frame. If the brightest area sits near the edge and the curve points away from your main subject, the viewer’s eye may leave too soon.
The goal is not to impress the viewer with a trick. It’s to help them understand the photograph quickly and enjoy the journey through the frame.
How to Practice S-Curve Photography
Pick one location and look only for curves. A park, beach, downtown street, marina, garden, or hiking trail can all work.
Take the same curve from several angles:
Eye level
Low to the ground
From a higher viewpoint
Closer to the start of the curve
Farther back to show more of the scene
Then compare the photos and notice where the curve feels clearest.
Next, add a subject. Wait for a person to walk into the frame, place your subject near the end of the curve, or use a bright patch of light as the destination. This helps you practise turning a nice shape into a complete photo.
A quick workshop exercise can help build this skill:
Choose one road, stream, or path.
Capture it in five different ways.
Change your distance, camera height, and position.
Compare which photo has the best balance.
Look for the clearest lead toward the subject.
As your knowledge grows, you’ll see more subtle curves. They may appear in a golden hour shadow, a line of snow in winter, or a gentle bend in grass after wind or rain. These small details can create a great composition when used with care.
Conclusion
S-curve photography is a simple way to add movement, depth, and structure to a photo. Start with roads, paths, rivers, shadows, and body poses. Once you notice the shape, you’ll start seeing it in more scenes.
The curve doesn’t need to be perfect. It only needs to help the photo feel clearer, more intentional, and easier to follow.