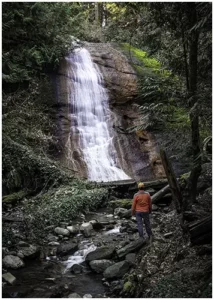
The Charming Northfield Falls in the Heart of Beach Estate Park
Looking to kill off an hour while in Nanaimo, BC? Just a short hop-skip and


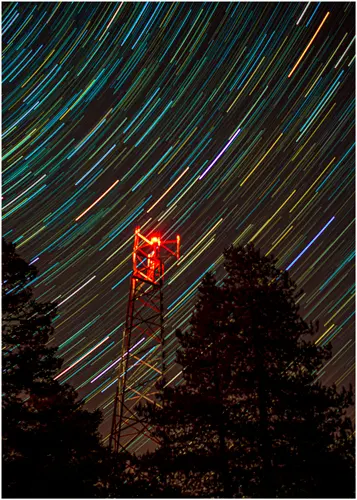
Are you ready to unlock the captivating world of Star Trails? The first step is knowing the best camera settings. Let us help you discover the secrets behind “star trail settings” where you’ll take your night photography to new heights!
In this beginner-friendly guide, we’ll demystify the process of photographing star trails. Whether you’re a novice or an experienced photographer, we’ll break down the essential settings and techniques needed to create those breathtaking star trail images.
If you’ve ever gazed at a clear night sky and wondered how to capture those mesmerizing streaks of light, then you’re in for a treat. Learn how to capture stunning star trail photos within this guide.
When heading out to photograph star trails, it’s crucial to consider the moon phase. The brightness of the moon greatly impacts the visibility and quality of the stars, and the exposure of the image. To determine the moon phase accurately, follow these steps:
By considering the moon phase, you can ensure a dark sky that highlights the brightness of the stars and allows for long exposures. Achieve better star trail photos by increasing star visibility and detail while reducing the impact of moonlight interference.
When shooting during a moon phase of 25% or less, you can see the stars clearly and still have sufficient light for objects in the foreground. Avoiding shooting during a full moon ensures that the moon’s brightness does not overpower the stars and wash out the image. By carefully considering moonrise and moon set times, photographers can enhance the overall quality of their star trail photographs.
Planning is a crucial step in achieving successful star trails. By taking the time to plan before we increase our chances of capturing stunning star trails shots. Planning allows us to identify the best place to be, the direction we want to shoot, where exactly the light pollution is going to be.
Before embarking on a star trails shoot, it is essential you have the right camera equipment. You need a sturdy tripod to keep your camera stable for long exposures. You also need a wide-angle lens with a low aperture, like f/2.8 or lower. I also recommended a shutter release to minimize camera shake, or use the camera timer. If you have a DSLR, you should use mirror lockup.
To plan your star trails shoot, consider the location and timing. Choose a location with dark skies to minimize light pollution and enhance the visibility of stars. If there is light pollution present, you can use it creatively in your composition. Check the weather forecast to ensure clear skies and avoid shooting during cloudy conditions. Opt for cold nights, as they tend to produce crisp stars and reduce thermal noise in the photos. Consider shooting during a natural phenomenon like a meteor shower to add an extra element of interest to your star trails.
1. Manual focus method: In the absence of sufficient light, switching to manual focus is often the most reliable approach. Begin by setting your lens to infinity (∞) and fine-tune the focus by gradually adjusting it until the stars appear sharp. Utilizing the magnification function on your camera’s LCD or viewfinder can aid in achieving precise focus.
2. Autofocus with a light source: If there is a bright light like a faraway city or if you shine a flashlight on the object, you could use autofocus. Aim your camera at the light source, half-press the shutter button to engage autofocus, and then lock the focus by switching to manual focus mode. This technique leverages the camera’s ability to detect contrast in the illuminated areas for accurate focusing.
3. Focus peaking and manual focus assist: Some cameras offer helpful features like focus peaking or manual focus assist, particularly in mirrorless systems. By enabling these options, the camera highlights the areas in focus, making it easier to determine sharpness when manually focusing in low-light conditions. Take advantage of these tools to achieve precise focus on your desired subject.
Remember, achieving sharp focus at night is a challenge; it’s essential to practice with different techniques to find what works for your specific needs. Sometimes it takes patience and perseverance to get it perfect.
Star trail settings, there are a few key considerations. I always set my camera to fully manual mode. Set the aperture to the lowest possible value (e.g., f/2.8) to allow as much light as possible to reach the sensor. Choose a low ISO setting (e.g., ISO 400) to minimize noise in the image. Finally, test your settings and test again. Shoot at 30 seconds to 1 minute to insure a) focus is spot on, b) you’re starting to see trails, c) your ISO is set for a correct exposure. d) have a coffee handy, this can take time. I’ve seen me take 30 minutes to get the camera settings perfect.
Once you get everything perfect, adjust the shutter speed based on the desired length of the star trails. Longer shutter speeds, such as 30 minutes or more, will result in longer trails of stars.
When I first started doing star trails, I was often confused by this part: What! Yes I know it’s true, I don’t know everything. We want to shoot at my widest aperture F/2.8? With landscape photography we want a small aperture to get everything in focus F/18. Nope it’s not that way with star trails or night photography. We want as much light as possible, remember how far away are the stars. Millions of miles?
F-stop, or aperture settings play a crucial role in star trails. A lower f-stop number (e.g., f/2.8) allows more light to enter the camera, resulting in brighter stars and a more pronounced trail effect. However, using a very low f-stop may introduce lens aberrations and reduce overall image sharpness. It is recommended to experiment with different f-stop settings to find the optimal balance between brightness and image quality.
ISO determines the sensitivity of the camera’s sensor to light. For star trails photography, it is generally recommended to use the lowest ISO setting possible (e.g., ISO 100- 400) to minimize noise in the image. Higher ISO settings can introduce unwanted grain and reduce overall image quality. However, depending on the available light conditions, you may need to adjust the ISO accordingly to achieve a well-exposed image. Again, test different ISO settings during your shoot and review the results to find the optimal balance between exposure and noise. Having said that, there is software available that will reduce the noise in your image.
The length of the shutter speed directly affects the appearance of star trails. Longer shutter speeds, such as a few minutes or up to and including an hour sometimes, are necessary. So, what’s the best approach? Well, it’s all about finding the perfect balance between capturing enough light and preventing unwanted blurring. Remember, experimentation is the name of the game. Play around with different shutter speeds until you find the sweet spot that paints a stellar masterpiece.
Breathtaking star trails can also be achieved in a single long exposure shot. This technique involves capturing the movement of the stars over a period of several minutes. It has its challenges, however a single long exposure can be a straightforward process.
In conclusion, shooting star trails in a single long exposure is a straightforward process. Follow the above steps, ensures camera stability, and helps to overcome the challenges of single long exposure star trails in your night photography.
Shooting multiple long exposures not only expands your creative options in post, it reduces the risk of overheating your sensor. By capturing a series of shorter exposures, 2-3 minutes vs 30-45. You prevent excessive heat of the sensor, which can lead to unwanted noise and image degradation.
By using this method, you will have to finalize the image in post-production. However, the advantage is that you will have all the files required to make a captivating time-lapse.
To capture multiple long exposure star trails using image stacking, follow these step-by-step instructions:
Shooting multiple long exposures not only expands your creative options in post-production but also safeguards your sensor from overheating, preventing noise and image degradation. This technique allows you to capture a series of shorter exposures, reducing the risk of excessive heat buildup. While it requires post-processing to finalize the image, the advantage lies in the ability to create captivating time-lapse sequences using the accumulated files.
Cameras with Live Comp make photographing star trails too easy, so easy it’s almost cheating. Live Comp is a powerful tool that simplifies the task of creating long exposures. It works by continuously capturing and combining multiple exposures in real-time, while retaining only the brightest areas of each frame. The feature prevents overexposure and shows the progress of star trails during exposure. The Olympus OM-D E-M1’s Live Comp makes it easy to capture stunning star trail photos with great detail and a wide range of brightness.
To achieve stunning images of star trails, it is imperative to use star stacking software. It allows you to merge multiple images into one. But which one to use?
Several software options are available for image stacking in star photography. Here are a few popular choices:
Remember to experiment with different software options to find the one that best suits your workflow and desired outcome. Each software offers its own unique set of features and capabilities, allowing you to unleash your creativity in capturing and processing stunning star trail images.
When it comes to star trail photography, a wide-angle lens with a low aperture, such as a 14-24mm f/2.8, is ideal. This lens allows you to capture a larger portion of the night sky while gathering ample light for stunning star trail images.
To capture stunning star trails, use a long exposure time (around 20 seconds to a few minutes), set a low ISO for reduced noise, and use a wide aperture to gather more light. Experiment with different settings to achieve your desired results.o.
The best way to edit star trail photography is by using specialized software like Adobe Photoshop or Lightroom. These tools allow you to stack multiple exposures, adjust brightness and contrast, and enhance colours to create stunning and captivating star trail images.

Looking to kill off an hour while in Nanaimo, BC? Just a short hop-skip and

Photography can be a fulfilling and enjoyable hobby that brings a creative outlet to your

Welcome to our guide to Photoshop tutorials for beginners: A Complete Beginner’s Tutorial for Learning