
Photography as a Hobby for Beginners: Unlock Your Artistic Vision
Photography can be a fulfilling and enjoyable hobby that brings a creative outlet to your life. Regardless of your level of experience, there is always


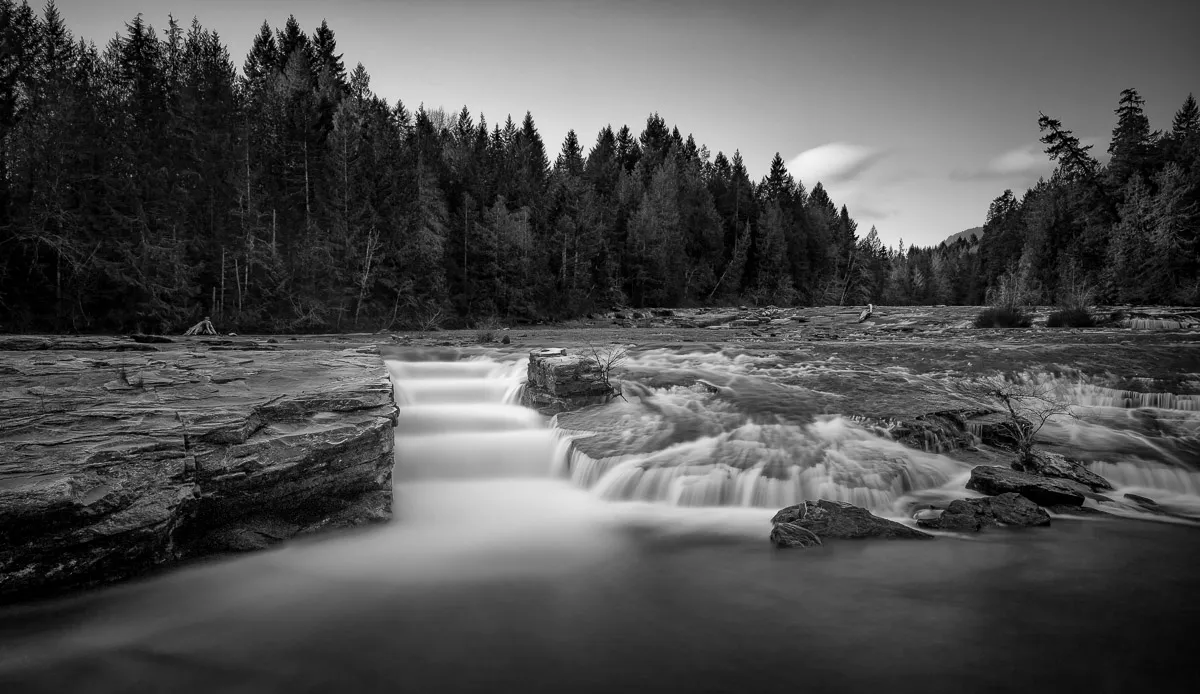
Long exposure photography is a technique that allows photographers to create images in which people and objects appear to be moving, or in which the background is blurred.
By using a long shutter speed, you can create photos that show the motion of cars, waterfalls, and stars.
It can also be used to capture the beauty of natural landscapes such as cloud and water movements. It is extremely useful to know when photographing waterfalls, or doing stars.
Essentially, it is the act of capturing images using a camera’s shutter speed that lasts longer than one second. The long exposure technique is mainly about engaging in a longer shooting duration.
Furthermore, this method necessitates the use of Manual mode.
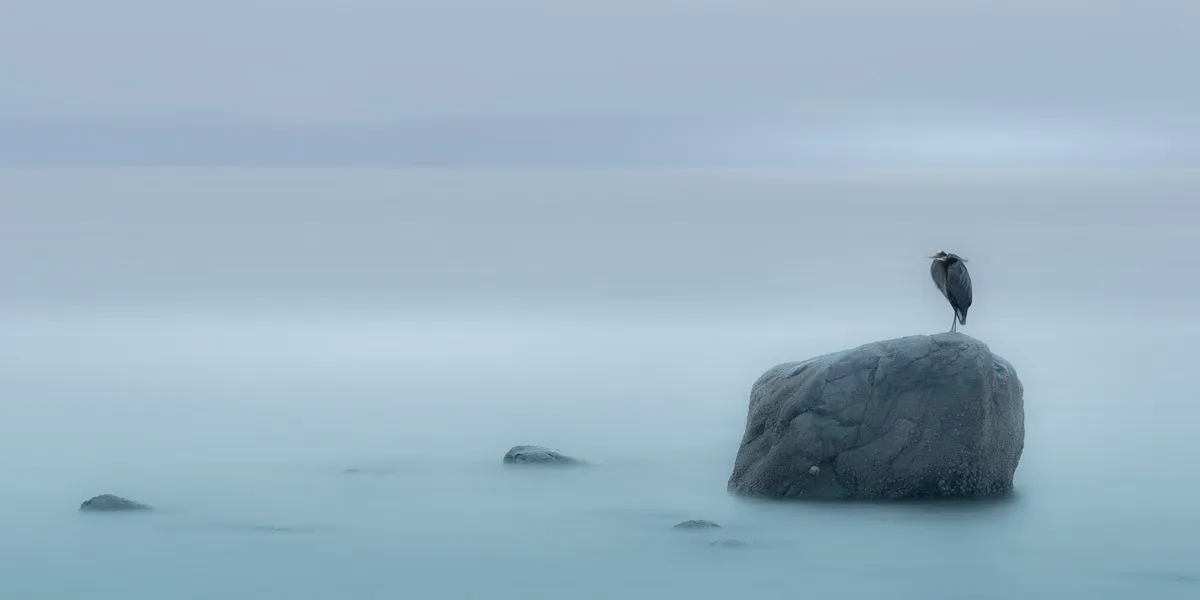
A long exposure photo is a photograph taken with a long exposure time, typically one of many seconds. Long exposures are commonly used in low-light photography because they capture the ambient light and noise in the same way as a normal exposure.
Long exposure photos can be used to create a beautiful landscape. The long exposure can help create a beautiful image, while the blurred result can also give the image a dreamy effect. Long exposure photography can also be used to create an artistic effect.
When done correctly, long exposure photos can create a surreal and dreamy look that’s unique and eye-catching. They can also be used to capture motion in a way that standard photos cannot. Long exposures can be used to photograph waterfalls, cars driving down the road, stars in the sky, and more.
In order to get smooth results, you need to use a tripod and keep your camera still for the entire duration of the exposure.

It is important to have a good camera for long exposure shots. Here is some essential equipment for Long Exposure Shots:

Long exposure photography is a technique that uses a slow shutter speed to capture a long exposure of a scene, creating images that appear to be moving. The technique is often used to create images of the stars or city lights in the night sky.
Make use of a tripod. Long exposure photography puts you at risk of camera shake. To keep the camera steady during lengthy exposures, use a tripod. Turn off image stabilization as well.
Bulb mode is required. A 30-second exposure can be achieved with most cameras. Use the bulb mode on your camera to go beyond this. Bulb mode allows you to leave your camera shutter open for as long as you choose.
Long exposure photography employs the use of static subjects against moving backgrounds, and vice versa. If you photograph a motionless object, such as a lighthouse, during a passing storm, the movement of the clouds will create a blurred sky that accentuates the static lighthouse by showing the illusion of time passing.
Long exposure photography requires action; without motion, there is nothing in the image to differentiate the passage of time. Depending on the action you want to capture, long exposure pictures can take anywhere from 15 seconds or longer exposures.
Use Neutral density filters. These filters are attached to a lens and block light from entering the camera. The other way to manage light is to shoot at night.
Test, test, and test some more. It’s not necessary for your first long exposure to be the final image. Try a few short exposure shots before taking a long exposure image. There’s no need to hurry. First, take some photos to make sure you like the framing and composition.
Because of the nature of long exposure photography, there are several opportunities for retakes.

Make sure you visit a location well in advance of your trip. You want to make sure you get a feel for the area and the type of environment you will be in.
Look for a location that has a mix of visual elements that are stationary and moving, such as trees by a flowing river, or clouds rushing past the top of a mountain.
Choose a place that isn’t in direct sunshine or bright light, as this can result in glare and overexposure.
When you’re doing long exposure photography, it’s important to scout out possible locations before you shoot. Spending time planning the ideal composition will produce in better long exposures, making all of your preparation worthwhile. Use Google Earth to scout some potential locations.
A tripod is essential for long exposure photography. It keeps the camera steady, preventing blur from becoming an issue. When shooting a five-second, ten-second, or even thirty-minute time-lapse.
Without a tripod to stabilize the camera, you’re going to have blurry out-of-focus photos. No matter the quality of the in-body image stabilization. Invest in a quality tripod, enough said.
From foreground to background, you’ll want to maintain a photo sharp.
I would suggest you switch to manual focus, focus the lens exactly where you want it. If you are going to use autofocus, set your active autofocus point on the subject, half-press the shutter button to engage the focus, then swap your lens from autofocus to manual. Even if you unintentionally click the shutter button again, the focus will remain locked.
Dial the camera to M Manual mode, Sometimes I do use aperture priority. Select the lowest possible ISO.
Set the aperture, I try to be between f/11 and f/18, depending on the scene. Choose a slower shutter speed, and take your first test image.
Check your histogram to see if the exposure is correct. Your display is too bright to be trusted. When you’ve achieved the desired exposure, your ready!
This is how bulb mode works on most cameras – You switch to bulb mode, and the shutter will stay open as long as you hold down the shutter release. Hold the shutter down and release when done! It’s great if you are using it to take pictures of fireworks, stars, or long exposures.
Having a cable release (wired or wireless) is critical. You can lock the shutter release without touching the camera and then unlock it when you want to end the exposure. This eliminates camera shake.
A Neutral Density Filter is a filter that reduces the amount of light entering the lens, allowing you to achieve longer shutter speeds in broad daylight. This is important for landscape and architecture photography because it allows you to capture movement in water and clouds without overexposing the photograph. There are different strengths of ND filters, with 10-stop being the most common, and 13 or 14-stop filters being necessary for very long exposures.
Adding a Neutral Density filter to your camera can help you produce well-exposed images in difficult lighting situations. ND filters reduce the amount of light entering the lens, which gives you more control over the shutter speed and aperture settings. This allows you to capture long exposure photos that would be otherwise impossible.
You’re almost there; how are you holding up so far? Now you need to determine the perfect long exposure shutter speed. This takes practice, and several test shoots. Remember the shutter speed you achieved during testing? We now need to adjust the shutter speed according to the filters used. For example, if your test shot was 1/100 and using a 10-stop filter, decrease by ten stops for approximately a 10-second shutter speed! OMG I can hear you already WHAT! I need to calculate all this in my head. No! I suggest you download the NiSi Exposure Calculator, It’s free and can be found in the App store. Finally, shoot away.
A camera’s histogram is a graphical depiction of your photo’s tonal values. In other words, it displays the number of tones of varying brightness in your shot, ranging from black (0 percent brightness) to white (100 percent brightness)
Check the histogram of the new photo, compare it to the histogram of the test photo. If the new histogram is shifted too far to the right or left, repeat the shot again.
Photography can be a fulfilling and enjoyable hobby that brings a creative outlet to your life. Regardless of your level of experience, there is always

Welcome to our guide to Photoshop tutorials for beginners: A Complete Beginner’s Tutorial for Learning Photoshop Basics! If you are new to Photoshop and eager

Creating stunning images is all about nailing the perfect colour grade. It’s what makes your photos pop and draws people in. But let’s face it,