Capturing Stunning Macro Photography In Forest: Nature Photos
Macro forest photography forces you to look for the tiny details that are often overlooked. For instance, you can observe the delicate patterns of the fallen leaves in autumn or the intricate details of mushrooms.
In these moments, every sound or ray of sunlight changes how you see nature. Autumn brings the forest to life with bright fungi, perfect for your day in the woods. But to capture these moments, you need the right gear and skills.
As you take your camera into the woods, you’ll learn to work with light and shadows. You’ll uncover the magical stories that nature shares with those who listen.
Key Takeaways
Macro photography reveals intricate details and, enhance your understanding of nature.
Autumn offers the best opportunities for fungi,and mushrooms.
In low-light conditions typical found in the forests, additional lighting techniques may be necessary.
Depth of field is shallow in macro photography; larger f-numbers like 11, 16, or 22 help achieve clarity.
Table of Contents
What Subjects Should You Focus on for Macro Photos in the Forest?
Exploring forests for macro photography reveals a world full of fascinating subjects. From unique fungi to diverse vegetation, focusing on these subjects can create unique and intriguing photos. Knowing where to look for intriguing elements can take your photography into a window into a hidden world.
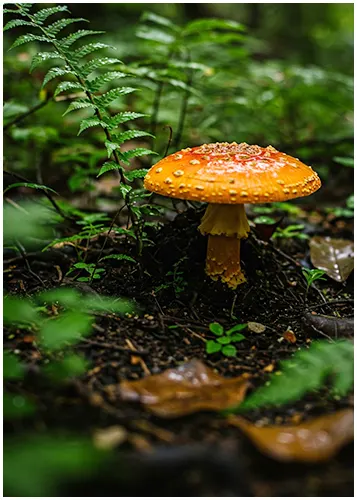
How to find interesting mushrooms for macro shots?
Mushrooms come in a wide range of shapes, colours, and textures, making them perfect for macro-photography. Look in damp, shaded spots where they grow abundantly.
Search for:
Distinct shapes, such as caps, gills, and vines.
Vibrant colours that contrast with their surroundings.
Texture variations in the mushroom’s surface.
Using a low aperture ensures your mushrooms are the main focus in your photos.
What forest plants make great subjects for macro photography?
Forest plants offer various subjects for macro photography. Some excellent options include:
Flowers with intricate patterns or hues like the wild orchid.
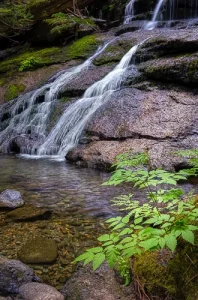
Leaves showing structural details or water droplets.
Fungi growing on trees or decomposing matter.
By focusing on details, you can create engaging compositions. Use natural light during soft hours for the best results.
How to capture the intricate textures of tree bark?
The surface of tree bark is a stunning subject for macro photography. To capture its details, focus on
Unique patterns and colours that highlight the tree’s age and environment.
Lichen and moss that often decorate bark surfaces.
Close-ups that reveal textures climbing tree trunks.
Try different angles and lighting to enhance your photos. This procedure lets the natural beauty of the forest shine through.
What Techniques Enhance Your Macro Photography Skills?
Strengthening your macro photography skills takes practice and learning new techniques. You can enhance your photos by employing focus stacking and using effective composition.
How does focus stacking improve macro photos?
Focus stacking is a technique that increases your photo’s depth of field. It involves taking several pictures at different points and merging them later in software. The process ensures every part of your subject is sharp.
What are the best composition techniques for forest macro photography?
Good composition makes your macro shots stand out. Using the rule of thirds can guide the viewer’s eye. It creates a balanced photo.
Look for leading lines in the forest to draw attention to your subject. Furthermore, try different angles and perspectives. This technique adds excitement to your photos, giving them a fresh look.
How to utilize shadows and light to enhance your photos?
Light is key in all types of photography especially in macro photography. Natural light can highlight your subject’s details. Shadows add depth and contrast.
Try back-lighting to show off textures. It makes your photos more captivating. In dark forests, you may need to use artificial light, like a macro-ring flash. It can help you to avoid harsh shadows and balances your exposure.
How to Create Depth in Your Macro Photography?
Adding depth to macro photos can make them more engaging. When you’re shooting in forests, think about the background, scale, and layers. These elements are key to making your photos stand out.
What role does background play in macro photography?
The background greatly impacts how we see your subject. A cluttered background can take away from your main focus. On the other hand, a soft, blurred background can highlight your subject.
How to achieve a sense of scale in close-up shots?
So, you’re trying to make those tiny forest floor photos look big? Working with macros can be tough. Though you’ve zoomed in close, how can you show that this tiny mushroom is part of a big forest?
One trick is to include something in your shot that shows size. Maybe a blurry tree trunk in the background or a fallen leaf bigger than your subject. Even a bit of the forest floor, showing the earth’s texture, can help.
You can also play with light. Sunlight streaming through trees, even a little, can make your tiny subject feel big. You’re trying to give the viewer a clue, something to compare to, so they get the scale of what they’re seeing.
What are the best practices for layering elements in your photos?
Layering adds depth and interest to your photos. Identify the foreground, middle, and background. Arrange your subjects to guide the viewer’s eye.
Using patterns and repetition can make your photos feel more cohesive. Don’t forget about lighting. A diffuser can soften shadows and bring out the forest’s textures.
Aspect
Technique
Notes
Background
Use a wide aperture
Aperture f/2.8 may isolate the subject effectively.
Sence of scale
Include familiar objects
Helps viewers relate to the size of the subject.
Layering elements
Foreground, middle ground, background
Creates depth and guides the viewer's gaze.
Looking to stretch your budget? We’ve got good news! Use the SPECIAL code whosaid15 for an extra 5% off
How to Use Flash Effectively in Macro Photography?
Learning to use flash in macro photography can really improve your photos, even in tough places like forests. Flash helps light up subjects when natural light isn’t enough. By using the right techniques, you can get great results without unwanted effects.
When should you use a flash for macro shots in the forest?
Use flash when natural light is too weak or when the subject is in the shadows. On cloudy days or in dense forests, flash can make details stand out. It’s great for showing off hidden features.
How to prevent harsh shadows when using flash in nature photography?
To avoid harsh shadows, try using a diffuser or bouncing the light. It softens the flash, making it more natural. Place the flash at an angle to show more texture and keep shapes natural. A small soft-box can also add a soft light that avoids harsh contrasts.
What techniques can you use to balance ambient light and flash?
Using both ambient light and flash can create a balanced look. Lower the flash power for subtle highlights that match the natural light. Experiment with different flash positions and settings to find the perfect mix.
Technique
Description
Off-camera flash
Enhances control over shadows and light direction, revealing details.
Using Diffusers
Softens the flash light, preventing harsh reflections and hotspots.
Flash Power Settings
Lowering power creates subtle highlights, ideal for softer photos.
Combining Light Sources
Blending ambient light with flash produces well-rounded exposures.
Flash Positioning
Adjusting angles can significantly affect the quality of light on subjects.
Mastering flash in macro photography can reveal the hidden beauty of forest subjects. With practice, you'll discover the best techniques for your style and the environment.
What are the Common Mistakes to Avoid in Macro Photography?
Macro photography lets you see the tiny details of nature. But, to get great shots, you must avoid common mistakes. Blurry photos often come from camera shake or bad focus. I can’t stress this enough use a tripod.
Also, think about your background. A messy background can take away from your main subject. This can make your photo less impactful.
How to avoid blurry photos in macro photography?
To get sharp photos, use a fast shutter speed, even when holding the camera. A little movement can cause blur. Longer lenses (100mm and up) help by keeping you farther from your subject.
At high magnifications, focus is very critical. A small mistake can ruin your shot. Practice using autofocus, but know it might fail in low light.
What pitfalls should photographers avoid when capturing small subjects?
When shooting in forests, choose the right lighting and composition. The midday sun can create harsh shadows. Instead, shoot in the early morning or late evening for softer, better light.
Also, use negative space in your photos. It helps show the size and context of your subject. This makes your photo more interesting.
How to ensure proper exposure in forest macro photography?
Getting the right exposure is key. In forests, it can be dark, so adjust your camera settings. This means playing with ISO and shutter speed.
Choosing a small aperture gives more depth of field but can slow your shutter. Knowing the exposure triangle helps you find the perfect balance. This way, you can avoid common mistakes and take amazing macro photos.
Conclusion – Macro Photography in Forest
In short, we have discussed how to create stunning macro images within the forest. We stresses the importance of a macro lens to capture detail, and it outlines how to photograph subjects like mushrooms and flowers on the forest floor.
You learn to manage light, focus, and background. The text also details techniques like focus stacking and flash use to showcase the hidden beauty of the forest floor. By understanding these concepts, you can avoid common mistakes and produce compelling macro photography.