
Browns River Falls: Hiking Guide (Comox Valley, BC)
I’ve been to Browns River Falls many times, and it’s one of those places I
Hunt for your perfect deal Easter sale on now! – 30% Off

Are you passionate about forest photography? Well, I am! I’ve spent countless hours in the woods with my camera and dog. Forests are truly magical subjects to capture.
Did you know forests cover about 30% of our planet’s land area? That’s a lot of potential for stunning shots! These environments offer endless opportunities for creative photography.
So, whether you’re a beginner or a seasoned pro, mastering forest photography starts with the basics. From the golden light filtering through leaves to the intricate details of moss-covered logs, there’s always something new to photograph. So grab a cup of Joe, and let’s explore some outdoor photography tips that’ll help you bring the forest’s beauty to life!
Forests are diverse ecosystems that offer endless opportunities for landscape photography. As a wilderness photography enthusiast, I’m always amazed by the variety of scenes I encounter. Let’s explore the different types of forests and their unique features.
There are three main types of forests, each with its own charm for forest scenery composition:
The diversity in forests is mind-blowing. Did you know the oldest living thing on Earth is a Great Basin bristlecone pine, estimated to be over 5,000 years old? And the largest living thing is a 300-foot redwood tree! This diversity presents both challenges and opportunities in your landscape photography guide.
Forest photography offers unique perspectives and challenges. They provide background elements for wildlife shots and unique opportunities for landscapes. The changing seasons offer diverse photo ops year-round. Atmospheric conditions like fog or snow add drama to your shots, making them essential in any wilderness photography essentials kit.
| Forest Type | Key Features | Photography challenges |
|---|---|---|
| Boreal | Coniferous trees and a cold climate | Harsh lighting and limited diversity |
| Temperate | Seasonal changes: mixed tree types | Varying light conditions and dense foliage |
| Tropical | High biodiversity, warm climate | High contrast, complex compositions |
Forests change with the seasons, offering a dynamic backdrop year-round. Each season has its own special moments for capturing the beauty of nature.
Spring brings new life to forests. Green leaves and wildflowers show hope and renewal, especially when captured in the foreground. The natural light shining through the leaves makes for excellent photos.
Summer forests are full of light and shadow. The leaves above create intriguing patterns on the ground. It’s perfect for photos of light and colour during the Golden Hour.
Autumn turns forests into a photographer’s dream. Trees turning red, orange, and gold. But you must act fast, as the autumn colors don’t last long.
Winter makes forests chilly and simple. Snowy trees can look monochrome. Bare trees in forests show intriguing shapes. Winter is ideal for photos with mist and fog.
| Season | Lighting Conditions | Suggested photography Technique |
|---|---|---|
| Spring | Soft, filtered light | Macro shots of new growth, wide-angle for overall renewal |
| Summer | Strong, dappled light creates beautiful hues and textures. | Use polarizing filters and concentrate on light patterns. |
| Autumn | Warm, golden light | Telephoto for colour compression, early morning shoots |
| Winter | Low, angled light | Long exposures for fog effects and high-contrast black and white can create stunning images with a focus stack technique. |
Seasonal changes are not just pretty; they're crucial for forests. As photographers, we get to show nature's beauty through our work.
Pro-Tip

Choosing the right gear is crucial for outstanding forest photos. Let’s explore the key items for capturing woodland magic.
For forest photography, a camera that photographs well in low light and has a shallow depth of field is optimal. Look for one with a high dynamic range. Weather-sealing is also important, as forests can be wet.
High ISO capabilities are vital for the dim light under trees.
Lenses need to be versatile. A wide-angle lens (16-35mm) is ideal for big forest views. A telephoto (70-200mm) is perfect for wildlife and far-off shots. Don’t forget a macro lens for close-up forest floor photos!
A sturdy, lightweight carbon-fibre tripod is essential in the forest. It helps with long exposures and low light. Could I suggest that a remote shutter release also aids in preventing camera shake?
| Equipment | Recommended Specs | Usage |
|---|---|---|
| Camera | High ISO, weather-sealed | Low lighting and damp conditions |
| Wide-angle lens | 16-35mm | Expansive scenes |
| Telephoto Lens | 70-200mm | Wildlife, distant details |
| Tripod | Lightweight, carbon fibre | Long exposures, stability |
| Filters | Polarizing, ND Graduated | Colour enhancement, exposure balance, and camera settings are essential for great photography. |
While the right gear is key, creativity is what makes your photos special. These tips will help you use your gear to its fullest in the woods.
Pro-Tip
Forest photography is both challenging and rewarding. Let’s look at some key techniques to capture stunning forest scenes.
Forest framing goes beyond the rule of thirds. While the rule works, don’t be afraid to use natural elements creatively. Fallen logs or winding paths can serve as wonderful leading lines, guiding the viewer.
Natural light in forests can be tricky but magical. The best summer shooting times are after sunrise or before sunset. In winter, you can shoot all day because the sun stays lower. Use a polarizer to make green tones richer and reduce leaf reflections.
For sharp landscapes, use aperture settings between f/8 and f/11. For dreamy effects, try a wider aperture. To keep everything sharp, try focus stacking; take multiple shots at different focal points.
| Technique | Purpose | Recommended Equipment |
|---|---|---|
| Backlighting | Create silhouettes, reduce background distractions | Telephoto lens |
| HDR | Expanded dynamic range | Tripod and image-averaging software |
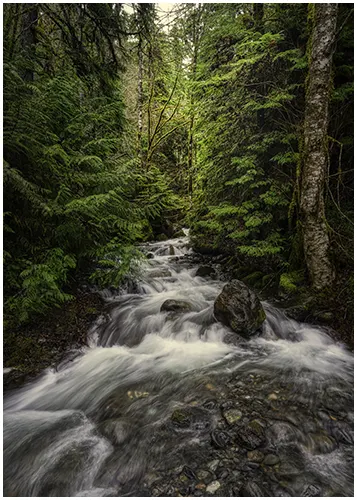
| Slow Shutter Speed | Capture a silky water flow. | ND filter, tripod |
Remember, simplicity is key in forest composition. Face toward the sun for powerful backlighting. Also, consider using telephoto lenses to focus on patterns and simplify your scenes, enhancing the overall focal length.
Pro-Tip
Weather is key in forest photography. It brings its own unique challenges and chances to capture woodland magic. Let’s see how different weather can help your photos.
The light in forests changes throughout the day. Morning light can give a warm glow to trees. On cloudy days, the light is softer, reducing shadows and showing off the forest’s greenery.
Misty mornings are my preferred time for atmospheric photos. The mist adds a magical feel to scenes. Use your telephoto lens and a higher ISO to manage foggy light.
Yes! I live in a rainforest, so rainy days are ideal for forest photos. The rain saturates the colors, but be cautious as it intensifies reflections on the leaves and the ground. A polarizing filter helps with glare and brings out the greens. Look for puddles for unique reflections after the rain.
| Weather Condition | Photography Tip | Recommended Gear |
|---|---|---|
| Golden Hour | Capture warm, dramatic light. | Wide-angle lens |
| Overcast | Highlight textures, colours, and hues in the foreground. | Polarizing filter |
| Misty/Foggy | Create an ethereal atmosphere. | Zoom lens, tripod |
| Rainy | Enhance vibrancy and reflections | Rain cover, polarizing filter |
There are no bad weather times for forest photography, just different opportunities to capture the beauty of the woodland.
Pro-Tip

Download your free trial today!
Bringing your forest scenery to life starts in post-processing. This guide covers key editing tips for your forest photos, including adjusting saturation and hue.
My suggestion for beginners would be On1 Raw or Luminar Neo. They have powerful tools and are easy to use and understand. Plus they come with preset to make post processing quick and easy. Adobe Lightroom and Photoshop are excellent for more advanced editing.
The forest photos have a rich color palette. Adjust the white balance to match the light. Use HSL sliders to tweak colors, like greens or fall tones.
Clarity and texture sliders help show off bark and leaves. Remember, small changes can make a big difference.
The mood of your image is key. Use the tone curve to change contrast. For misty scenes, lower contrast and add blue for a mystical feel.
Warm, sunny forests look better with a warm colour palette. This adds coziness.
It’s about enhancing, not changing everything. Keep your original files safe and enjoy your forest photos!
| Editing Technique | Purpose | Tool |
|---|---|---|
| White balance | Accurate light representation | Temperature/Tint Sliders |
| Colour enhancement | Vibrant forest scenes | HSL panel |
| Detailed refinement | Highlight textures | Clarity/Texture Sliders |
| Mood creation | Atmospheric Effects | Tone Curve/Split Toning |
Are you prepared to impart your knowledge of forest photography and outdoor photography to the world? You might want to capture the beauty of nature. Let’s dive into the exciting realm of showcasing your work! I’ve been capturing forest scenes for years, and I’m excited to help you share your stunning shots.
There’s a whole forest of online platforms where you can showcase your work. I love using 500px and Flickr to connect with fellow shutterbugs and get feedback. These sites are excellent for honing your forest photography basics. If you’re feeling more pro, why not set up your own website? Squarespace and WordPress are my go-to platforms for this.
When it comes to portfolios, less is often more. Pick your absolute best shots that scream “you.” Consider narrating a story through your chosen images, such as the seasonal changes in your beloved forest or the wildlife you’ve encountered. Keep it organized and simple to navigate. Remember, your portfolio is like a visual handshake. Make it count!
Social media is a game-changer for photographers. Instagram is my preferred platform for sharing forest shots, but don’t neglect Facebook or Twitter as well. Share the stories behind your images, your outdoor photography tips, or even your challenges. Use relevant hashtags to boost visibility. I’ve found that posting consistently keeps my audience engaged. Building a following takes time, so don’t sweat it if growth is slow at first. Keep creating and sharing quality content. Your forest photography journey is worth sharing with the world!
Forest photography offers endless opportunities to capture nature’s beauty—from lush greenery to vibrant autumn colours. Key tips include shooting during Golden Hour or overcast days for ideal lighting, using a tripod for stability in low-light conditions, and experimenting with composition techniques like the rule of thirds.
Seasonal changes, weather effects like fog or rain, and the right gear—such as wide-angle lenses and polarizing filters—enhance your shots. Whether you’re a beginner or a pro, these basics will help you create stunning forest images that showcase the magic of the wilderness.

To take a lovely picture of trees, use natural light, focus on intriguing textures or patterns, and frame with the rule of thirds. Shoot during golden hour for warm tones, and experiment with angles—low or high—to add depth. Include foreground or background elements for a dynamic composition.
For woodland photography, use a low ISO (100-400) for clarity, a narrow aperture (f/8-f/16) for depth of field, and a slow shutter speed (1/30s or slower) for light. Adjust based on lighting conditions and use a tripod for stability.
For forest photography, use Aperture Priority (A/Av mode to control depth of field, ensuring sharp focus on subjects while blurring the background. Set a low f-stop (e.g., f/2.8-f/5.6) for detail or higher (e.g., f/8-f/11) for wider scenes. Adjust ISO for low light.
I’ve been to Browns River Falls many times, and it’s one of those places I

Colour is one of the most powerful tools in photography. It’s how people feel about

I’ve visited Trout Creek Falls multiple times over the years, and it’s one of those