What is HDR in Photography? Unlock its Powers: A Beginners Guide
What is HDR photography? If you’re new to photography, you may have heard the term HDR and pondered what is it. HDR stands for High Dynamic Range, and it’s a technique that can produce images with a greater range of tonal value. HDR photography is appealing for several reasons. In this article, we’ll explain everything you need to know about HDR photography, including how to shoot high dynamic range photos with your digital camera.
Table of Contents
What is high dynamic range (HDR) photography?
High dynamic range (HDR) photography is a technique that involves capturing multiple images of the same scene using different exposure level, and then combining those images in post into one image that represents the full range of tonal values.
This technique allows us to capture a scene with a greater contrast between light and dark areas than a single photo.
How does HDR work?
Take multiple images at different exposure levels, using the camera HDR function or manually bracketing the exposures.
The images are then imported into the HDR software, which aligns and blends them into a single image.
The software allows us to adjust the tonality of the image, which can control the overall contrast and tonal balance of the single image.
Why HDR Photography Has a Bad Reputation
HDR photography has developed a poor reputation because of over-saturation/over-post-processing of photos. HDR software has made it easy for photographers to manipulate photos, resulting in surreal, fake and over-the-top pictures.
These images have become synonymous with HDR, resulting in many of us to avoid using it. Good HDR photos are subtle and keep the natural look. Depending on your preferences, you may use realistic editing or go crazy – this allows you more creative control over your photos than traditional photography approaches.
Is HDR Photography Still Relevant?
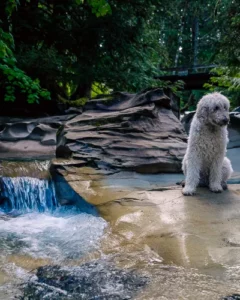
Yes, HDR photography is still relevant today. You can create stunning and captivating photos, especially for landscape and real estate photographers. By using exposure bracketing and proper post-processing techniques, we can still get a greater sense of depth and detail.
Also, shooting in RAW format preserves image quality while making editing easier.
Looking to stretch your budget? We’ve got good news! Save an additional 10% use code bwild10
Benefits of shooting high dynamic range photos?
1. They create a more realistic image of the subject.
A high dynamic range (HDR) photo has the potential to represent more of what our eyes normally see. It gives us a higher range of light and darks, allowing us to create images with more dynamic range. This technique also helps in removing any unwanted noise and/or artifacts that may be in the photo. HDR photography can enhance natural colours and contrast while maintaining clarity and reducing harshness in shadows or highlights.
Ultimately, shooting high dynamic range photos creates a more realistic image of the subject by allowing photographers greater control over how they capture light and its effects on their subjects.
2. They can be more visually appealing than regular photos.
HDR can better capture the full range of luminosity, allowing for more detail in the highlights and shadows. This is useful in situations where there is a notable contrast between light and dark areas.
HDR can produce an artistic where we can exaggerate the tonal differences. Creating a dynamic and visually striking image than wouldn’t be possible in a single photograph.
3. They show more details in shadows and highlights.
Shooting high dynamic range (HDR) photos allows for us to get more details in the shadows and highlights.
However, while HDR photography can help reveal more detail in both areas, it is important to remember that capturing an exposure “perfectly” is still the goal. Bracketed exposures in .7EV increments is what I recommended. I find if we bracket more than that .7EV there is too much of an increase in exposure for a proper blend of the photos.
Using high dynamic range sometimes does not work well with backlit subjects (the light source behind them) or shaded against bright backgrounds.
4. Can an HDR photo give a more dramatic effect to the photo?
Yes, HDR photography can create a more dramatic effect. By adjusting the tonal map, you can create a photo with a higher contrast and dramatic look. But should you?
This is effective where the photo has a high contrast between light and dark, or when you want to create a more artistic photo.
However, not all HDR photos need more drama, it ultimately depends on what story you as the photographer are trying to tell. It’s up to everyone to use the HDR technique effectively and create an image with the desired level of drama.
5. They can create a better illusion of depth
An HDR photo has the potential to create a better illusion of depth, with its larger dynamic range. Combining multiple photos with different exposures into a single image captures a wider dynamic range than possible with a single photo.
6. They can be more effective at capturing low-light scenes.
In low light conditions, it’s difficult to capture all the details in a single click. HDR photos can capture low-light scenes better. By shooting multiple exposures and combining them into one image.
7. HDR mimics the eye
I know I’ll get a fight-back on this, but HDR photography has the potential to produce images that are closer to what we see if done properly. By adjusting the camera to catch both highlights and shadows, we create a more accurate representation of the scene.
What equipment do you need to shoot high dynamic range images?
1. Which digital camera will shoot HDR photography?
Most DSLR’s or mirrorless cameras can shoot HDR. If you’re looking for a camera for HDR photography. I would consider features such as in camera HDR and low light performance.
2. Best lens for High Dynamic Range photography
To capture high dynamic range photos successfully, look for lenses that have wide aperture and image stabilization to reduce camera shake when shooting handheld. Focal length and sharpness also play an important role in ensuring the final HDR image is as detailed as possible.
3. Best camera settings for HDR Photography
First, I would set the camera to shoot RAW instead of JPEGs, use the lowest ISO possible, a fast shutter speed to freeze movement. I prefer to use aperture priority with continuous shooting.
Check your histogram (the graph on the back of the camera) often, so no data is being lost and do not over-edit your photos in post.
4. What software do I need to post process HDR photos?
I prefer to edit in Adobe Photoshop, Photomatixand Skylums Aurora HDR. These programs have unique features for aligning and blending multiple exposures, adjusting tonal mapping and making other adjustments to the image. They offer presets and customization options for users who want more control over their photos.
How to shoot high dynamic range images with a digital camera?
Step 1: Set up your camera
Set your camera to take photographs in RAW not JPEGs: RAW captures more dynamic range and colour information.
If there is no chance of movement in the subject, use a low ISO to ensure that it has the least amount of noise.
If there is a risk of movement, use a faster shutter speed and burst bracketed in continuous shooting mode to reduce motion blur between frames.
Use aperture priority so that your depth of field remains constant between shots.
For your first photo, confirm with your histogram to insure no information is lost.
Step 2: Take a “correctly” exposed image.
Take a test shot, check your histogram for a properly exposed photo. Adjust if necessary.
Take your first HDR photo and review the results. Mid-tones should be well exposed while highlights and shadows are less important.
If the image is too dark or bright, adjust your shutter speed and reshoot to get a perfect 1 photo.
Reduce shutter speed by 0.7, take another photo at 1.3 If you feel you need more, keep adjusting your exposure down by 0.7
Set the camera back to the original 1st perfect photo. This time increase your shutter speed by 0.7 and take another. This time you should get an underexposed photo lacking shadow detail. Continue on matching the number of photos shot in step 2.
Pro Note. I prefer to use an odd number of photos when shooting HDR. In groups of 3, 5, 7, 9
Step 3: Consider the results and take more photos if necessary
Review all the photos along with the histogram. If you have any photos, that is totally black or completely white. I would highly suggest you start again. Unless you are shooting over 5. You only need 3 to create an HDR image. I have found that 5 is the perfect number for me and a jump 0.7 of exposure is the best. Jumping a full stop creates too much of a bump in tonality. Using 0.7 is better for fine-tuning the photo in post. Best advice I can give here, is to experiment to see what works best for you.
Post-processing workflow, basic corrections
Blending the Images Together
Import the photos into your post-processing software, such as Lightroom.
Post-process the 1st image for corrections and sync to all the other photos.
Select all the files and right-click to choose Photo>Photo Merge>HDR. Or
Send all the photos to your favourite HDR software.
Check the Auto Align box if necessary, as well as the Auto Settings box if desired.
Select the medium or high de-ghosting option if there were moving elements in your scene (such as blowing branches or people walking).
Hit Merge.
Common HDR issues with photos
Flattening Your Image
Flattening an image refers to reducing the contrast between the original bright and darks in an HDR photograph. This results in a single tone across the scene.
Flattening an image reduces its contrast and can make it difficult to understand. It eliminates any interesting contrasts, reducing its appeal overall. By keeping some contrast between light and dark areas of the scene, you can ensure that your HDR remains both interesting and natural-looking.
Black Clouds
One of the most obvious issues with HDR is black clouds.
The clouds may become too dark, losing their definition and detail.
The contrast between the bright sky and dark clouds may appear unnatural or unrealistic.
Moving clouds can create patches in the sky or unnatural movement effects.
Black puffy clouds on a sunny afternoon are not an accurate representation of bad weather.
Watch for halos in landscape and nature photography.
Halos, OMG I cannot stress this enough.
Halos are easy to spot in over-processed photos. They appear around buildings, trees, and highly contrasted edges.
Go easy on the contrast and clarity settings. This is when you will create halos. Use minor adjustments, avoiding heavy adjustments. Keep an eye out for artifacts that may appear in your photos because of excessive change. These can be removed with Photoshop’s healing brush or another similar tool.
Chromatic Aberration
In HDR photography, the merging of photos entails making modifications to the image’s colour and tone. Chromatic aberration can be a significant concern, as it can amplify any existing chromatic aberration.
It’s important to be aware of chromatic aberration and take steps to minimizing it in post. By paying attention to these issues, you can ensure that your HDR images are clear and detailed.
Photo Editing Software vs Camera With Built-In HDR Setting
Photo editing software and cameras with built-in HDR settings can create HDR. However, they work in slightly different ways and offer different benefits and drawbacks.
Photo editing software, such as Adobe Photoshop or Photomatix, creates an HDR photo by combining multiple exposures into a single image. They align and blend the photo with automated tools. The resulting image will have a wider range of tones than a single photo.
Cameras with built-in HDR settings capture HDR photos automatically, with no post-processing. These cameras use algorithms in the setting to combine the multiple exposures into a single image.
There are several differences between these two approaches to HDR photography.
Quality: HDR images created with photo editing software can often be of higher quality than those created with a camera’s built-in HDR setting, as the software allows the photographer precise control over the results.
Time and effort: Creating an HDR image with photo editing software can be more time-consuming and require more effort than a camera’s built-in HDR setting. However, the results can be worth the extra effort.
Control: Photo editing software gives the photographer more control. We can adjust the exposure, contrast, clarity and other settings to achieve the desired result. Cameras with built-in HDR settings offer less control, as the processing is done automatically.
Overall, both photo editing software and cameras with built-in auto exposure bracketing feature can be useful tools for creating HDR images, and the best choice will depend on the specific needs and preferences of the photographer.
Final thoughts what is HDR in photography
High Dynamic Range (HDR) photography is a unique style. It’s great for landscapes. However, it should be avoided when photographing movement, especially wildlife. Your chances for a blurry photo are higher. HDR software is used for merging and tone-mapping and the finishing touches can be done in Lightroom, Capture One, Photoshop, and Affinity.
Exposure bracketing sequence is capturing a series of photos that are then blended using software into a final single high dynamic range (HDR) photograph. To achieve an HDR effect, photographers take more than one photo while adjusting the camera setting at different exposure levels. Bracketing allows photographers to capture details in both dark and bright areas, resulting in rich colours and contrast.
Adobe Photoshop is the most widely used. It offers a variety of tools and features, such as layer masks, selection tools, filters and adjustments. The latest version also provides advanced masking capabilities, which make it easier to edit specific areas of an image without affecting the rest. On the other hand, Luminar Aurora and Photomatix are specifically designed to merge multiple photos into a single image. They offer a wide range of presets and manual options. If you want more control over your edits..
Aperture or manual are the two best options for HDR photography. Both allow you to set your ISO to its lowest value, and choose an aperture that gets you your desired depth of field.
Most DLSR of mirror-less cameras are capable of doing HDR photography. It often depends on your specific needs and budget and whether you want manual or auto function.